December 15, 2023, by Laura Nicholson
Moodle Gradebook tips
A festive shout-out to Alvaro Roberts, our Senior Learning Technology Consultant, for writing today’s advent calendar post! Alvaro shares three great tips when using the Gradebook in Moodle. 🎄🌟
As teaching comes to an end for 2023, there may be assignments to mark before the next semester begins. This post touches lightly on the Moodle gradebook or ‘Grades’ which hopefully can give Teachers and Editing Teachers some useful tips and insight into the gradebook.
The module gradebook contains all the grades for each student on anything assessed within a Moodle module. Accessing the grade book can be done by selecting the hamburger menu (icon with 3 lines) on the top right of a module and then the drop down selecting ‘Grades’.
Tip 1: Overriding marks
If there is a need to override the original grade provided within an assignment (such as Turnitin or Moodle assignment) then it is possible to do so within the grade book.
- After selecting ‘Grades’ in the module, locate the assignment column and select the blue pencil.

- A new screen will load, check the button within the ‘Override’ column of the student grade that needs to be overridden. Once checked enter the new grade within text box in the grade column.

- Once the grade has been entered, select ‘Save’ and then return to the ‘Grades’ page. The new grade will appear in a gold-coloured box.

Do note, that the original grade given within the Moodle or Turnitin assignment itself will still be there, it has just been overridden in the Moodle gradebook.
Tip 2: Grade history
If there is a need to see the history of a grade, for example, when the mark was issued or any subsequent changes made then you can see it by visiting the ‘Grade history’.
- After selecting ‘Grades’ in the module from the drop menu select ‘Grade history’.

- In the ‘Grade history’ page there are options to select a specific user, which assignment within ‘Grade item’ and even a date range.

- Once the settings have been selected, press the ‘Submit’ button and the report will appear below. The top row will display the module total and beneath that will be the latest grade. The example screenshot below shows the record of the grade overridden as discussed in the previous tip. It was first marked at 4:30pm on the 1st December but then the grade was changed at 4:52pm. It is also possible to download the grade history in multiple formats by pressing the ‘Download’ button.

Tip 3: Scales
If a particular assessment is be marked but not with the 1-100 marking scale, then it is possible for a scale to be created for the individual module that can then by applied to a Moodle assignment.
- After selecting ‘Grades’ in the module from the drop menu select ‘View’ from within the ‘Scales’ section.

- A new page will load called ‘Module scales’. On this page it’s possible to choose any site wide created scales within the ‘Standard scales’ section or create a new one for the module by scrolling to the bottom of the page and pressing the ‘Add a new scale’ button.

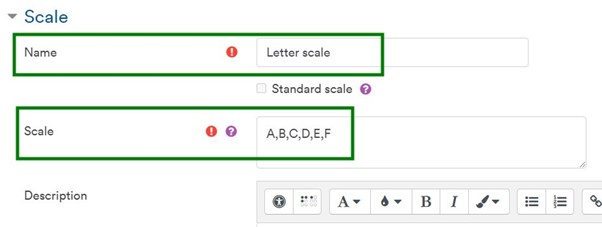
- In the ‘Scale’ page enter a name for the scale and within the ‘Scale’ section enter the new scales using a comma to separate each one. Once completed press the ‘Save changes’ button.

- To apply the scale, in a Moodle assignment settings page within the ‘Grade’ section, select ‘Scale’ from the drop-down menu and then select the scale you created from the drop-down menu below.

Hopefully this blog post has given an insight into the Moodle gradebook and some of what it can be used for. There are more features and functionality to the gradebook and if you are interested we recommend you start by reading our guidance pages on Moodle grades.
No comments yet, fill out a comment to be the first

Leave a Reply