December 3, 2023, by Ben Atkinson
Assessments, Marking and Feedback in TurnItIn
In this post, we outline the process of creating Turnitin assessments within your Moodle site and some tips for approaching marking and feedback on Turnitin.
Before you start using Turnitin for the first time, you should read the guidance below to ensure you are aware of best practice for using the features of Turnitin within Moodle. Here we are talking about creating stand alone Turnitin assignments, rather than using the features of Turnitin similarity checker with a Moodle assignment, to achieve this you can follow the steps in this helpsheet which details the process.
The first time you create a Turnitin assignment, you will be sent a login from http://www.turnitinuk.com which is the vendor’s site. You can view and grade assignments on this site as well as through Moodle, but this is not optimal. All staff are advised to access Turnitin assignments through the dropbox in Moodle, whether to edit, or mark or use Feedback Studio.
Important points to keep in mind:
- Like Moodle Assignments, Turnitin allows the electronic submission and marking of assignments.
- Its main purpose is to provide plagiarism/similarity reports. It does this by text-matching submitted assignments against an extensive library of journals, periodicals, previously submitted student essays and visible internet pages.
- Warning Note: All originality reports and assignments are stored on the Turnitin server, not the UoN server. We therefore advise that all assignments with originality reports are downloaded after the deadline to ensure you have a local copy.
- Warning Note: The assignment (class) lifespan is 6 months after the first assignment has been created on the module site. After the 6 months have passed all assignments will be timed out. The Turnitin lifetime for the module can be extended by 3 months by creating a new assignment in the same module or by reactivating in Turnitin’s admin. You can continue reactivating for up to 5 years.
It is important to remember that each Turntin assignment must be created from scratch. You cannot copy or import Turnitin assignments as this will break the link to Turnitin, even if it looks like the assignment has been copied over correctly within your Moodle site. Please avoid doing this as it can cause lots of problems with your module further down the line.
Because Turnitin is designed primarily for checking the similarity and plagiarism of written work, it will not accepted video or audio file upload. The best formats to use to ensure that Turnitin successfully interprets student work, are word (.doc .docx) and PDF (.pdf).
Creating a Turntin Submission on Moodle
Follow the steps below to create a Turnitin Assignment on Moodle. These instructions related to Moodle 4.1, launching Dec 18th 2023:
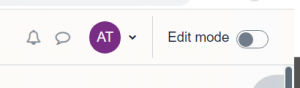
- Log in to Moodle, navigate to the module and turn on editing mode (Toggle switch on the top menu bar of Moodle)
- In the relevant topic, click the ‘Add an activity or resource’ button below the last activity.
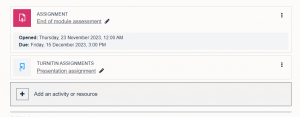
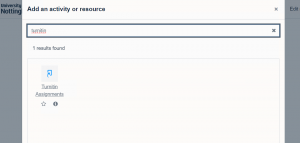
- In the window that appears, select or search for ‘Turntin Assignment’.
- You will now need to fill out all the settings for your Turnitin assignment, including title, description, due date and feedback release date. You can also enable anonymous marking, add a rubric to grade from, and choose whether students can see their own similarity scores. For a full breakdown of these settings see the workspace page on this topic.
- Once you’ve set everything up as you want it in Moodle, click on the ‘Save and return to module’ button
Accessing and marking a Turnitin submission
Marking a Turnitin submission involves opening the Turnitin inbox, reviewing the student work and adding a grade. You can also add feedback comments and QuickMark within Turnitin Feedback Studio.
1. Go to your Moodle module and click on the assignment name/title.
Example:

2. The ‘Turnitin drop box’ will load and display a layout similar to the image below.

3. In the lower part of the Turnitin dashboard (in the “First Name/Last Name” column) either the student’s name will appear or ‘Anonymous marking enabled’ will be in place of the student’s name.
3. To mark the assignment click on the ‘Blue pencil’ icon which will launch a pop-up window for the ‘Feedback studio’ in Turnitin. If the pop-up does not appear look near the URL address bar in your browser in case pop-ups have been disabled.
Note: When the Feedback studio is open, you are now working on Turnitin’s server, NOT the Moodle server at the University of Nottingham. Please save regularly (click once in the main window, close the Turnitin window and re-open it). At least every 15-20 min is recommended.
4. Once you have read the assignment and are ready to grade you can enter the mark on the top right hand corner (see green box in the image below) and then click outside of the /100 box. This will ensure the mark is saved.
Please note: If you press ‘Enter’ after you enter a grade it will not save. You need to click somewhere on the assignment.
5. When you are ready to move on, click on the ‘Page numbers’ (shown below in the orange rectangle) or the arrows to select the next submission you wish to mark. Alternatively, close the window and click the blue pencil for the next assignment.

6. When you close the Feedback Studio tab, the marks will automatically synchronise with Moodle and appear on the same row as the student’s details and submission within the “Grade” column.

Using QuickMarks within Turnitin to ensure consistency
Turnitin Feedback Studio comes with a powerful feature built in called QuickMarks. These are useful if you wish to ensure consistency across your marking, or if you use a similar style of feedback comments across a range of assessments. Turnitin comes with a series of built in QuickMarks which you drag onto any student work you are marking. Some quick marks have their own description, others allow you to add additional comments to explain your point.

The real benefit of QuickMarks is being able to create your own collections, as this allows you to pre-create common feedback comments you would usually use and have these ready in Turnitin Feedback Studio so you can drag them out on the work you are marking. This improves the feedback experience for students and also ensures consistency across all the work you marking.
Further information and guidance
No comments yet, fill out a comment to be the first

Leave a Reply