March 1, 2009, by Teaching at Nottingham
Effective demonstration of bench practical skills to large laboratory classes using an integrated system of visualisers, screens and SMARTboard
 Colin Melia: “In these labs, we teach our students how to make different types of medicines including liquid medicines, creams, ointments, powders and suppositories. The students learn skills that they’ll have to use when they work in a hospital pharmacy manufacturing unit, a ‘specials’ medicines lab or anywhere where individual medicines have to be made on a small scale for individual patients. In lectures we teach them about the properties of drugs and ingredients and how medicines are designed, but in this class they learn the practical techniques they need to make safe, effective and high quality medicines for human or animal use.
Demonstrating in the lab as it was.
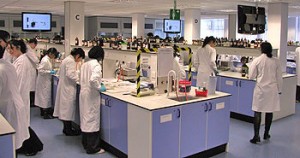
“The lab is awkwardly shaped and has internal pillars. Students were gathered around a bench at the front of the class to watch the demonstrations as they couldn’t see from sitting at their working benches. However, as our student numbers increased to around 50 students in the lab they had increasing difficulty seeing over each other. Students with poor eyesight or who were shorter, often found it difficult to see and occasionally a student would feel faint and have to retire to a seat where they couldn’t see properly. This meant that the demonstrations were becoming increasingly less effective as an educational tool.
The new equipment.
“Funding from the Visual Learning Lab has helped us deal with these issues very effectively.
Cameras
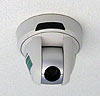
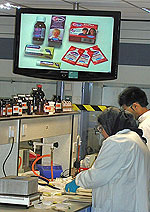
 “We had some overhead and bench cameras (‘visualisers’) installed. Located above the demonstration bench, this is similar to the type used for shop security. We can show the whole lab, large areas of the demonstration bench or zoom in close to see fine detail. A printed page of A4 can be projected with good clarity.
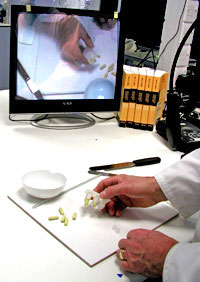
A monitor on the demonstrator’s bench shows what will be seen by the students on screens around the lab. Here we are showing how to release suppositories from their moulds using a technique that ensures they will not fracture.
SMARTBoard and LCD screens
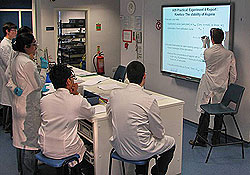
“The camera images are shown on six large LCD screens distributed around the lab and projected onto a SMARTBoard at the front. After trial and error we found that the best location for the LCD screens was at the end of each working bench: this provided all students with a good view when both standing and sitting at their workplaces.
 “We upgraded the audio system in the lab, so that sound and speech could be heard clearly and we linked the screens and sound to the SMARTBoard, so that we can bring in multimedia content from the web, and highlight important details (by drawing on the SMARTBoard) as we go along.
“Very large, bright screens are the key to having a high impact on the students. Too small and they can’t see the detail in what you are demonstrating. Under normal laboratory lighting, the SMARTBoard can be difficult to see from a distance. In contrast, the screens are closer, brighter and have greater clarity and impact.
 Controlling which images are displayed
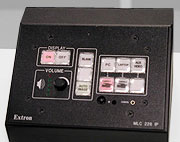
“There’s a simple button panel on the bench which allows us to switch between different cameras and computers to change the students’ display. We can also blank the screens in the lab and use only the monitor or the SMARTBoard.
How has this improved our teaching?
Demonstrating lab techniques
 “We can now show detailed close-ups of our demonstrations all around the lab which can be seen easily by all students at their own bench. The location of the screens at the end of the benches means that students can sit down, in their own lab place and see exactly what I’m doing whilst listening to a running commentary. They can listen and take notes in comfort, and we can practice difficult techniques all together, as we go through the procedures stage-by-stage on the screen.
 “It takes time and practice to work proficiently under a camera, even with static objects. The blue dots on the bench guide the demonstrator to the area that will be shown on screen. It’s particularly unusual performing demonstrations and watching your actions on the monitor, because you’re viewing the same movements, but from a completely different angle.
“Now that we’re comfortable using the equipment, it’s actually made it much easier to teach. It isn’t easy at first as you do feel you’re talking to a bench most of the time, but you can also feel the ambience. The students are quiet, which usually means they are concentrating, and it’s noticeable there’s usually no-one chatting at the back.
“We have also used the system for full scale lab demonstrations by swivelling the camera away from the bench and zooming out. For example, our laboratory technician can explain to students the correct disposal techniques for different types of medicinal waste. This is a key health and safety responsibility for our students when they become Pharmacists in practice.
Feedback during the class
“As well as giving an initial demonstration, we can also stop the class if we find that students generally are getting something wrong. We can alert the students that most of them are not getting a particular point and then do a quick demonstration to show how a technique is done correctly. In previous years, we had to stop the class and gather students at the front which was disruptive. Now it’s much easier to take an impromptu ‘time out’ to teach an important point.
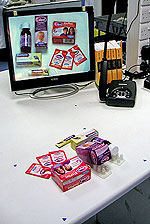
 “When not doing demonstrations, we can project examples of commercial medicines, or examples of good and poorly made products on the screen, so that students can see the difference between a high and low quality product. We can also undertake small group tutorials by gathering groups of students around the SMARTBoard at the front as necessary.
“This audiovisual system can’t substitute for one-to-one tuition at the bench, but if we encourage teaching assistants to report any general problems, we can then correct bad technique or misconceptions quickly.
The change in student attitude and apparent improvement in learning.
 “Teaching staff have commented that student confidence during these practicals has markedly improved since the introduction of our new audiovisual facilities. There is much less apprehension in the class (students are acutely aware that making medicines is a serious business as patients’ lives are at stake) and the great majority of students seem to be enjoying the classes.
 “An unexpected outcome is that students seem to be making fewer mistakes and are leaving early having completed the exercises more quickly than before. There are sometimes one or two students who want to use more of the available lab time, but in general we have shorter classes. It seems to be a result of students knowing what they’re doing, and having more confidence to do it.
Future possibilities and relevance to professional practice.
“We’ve been running classes with this system for 2 years, but not yet fully exploited its capabilities. We could record practical sessions for students who missed the class or for revision purposes, but the potential uses of the system are much more wide-ranging. The link into the SMARTBoard and the Internet allows us to project any content we wish around the lab or to export our own images elsewhere.
“We could therefore, as part of the class, show our students how medicines are manufactured in a real life hospital pharmacy or in a large pharmaceutical company on an industrial scale. This would help put their learning into context in terms of the future environments in which they might work. We could also show where the pharmacist’s contribution (in terms of making a high quality medicine) fits within the cycle of a patient being diagnosed with an illness, seeing the doctor and them eventually getting better, so again it will show them the relevance of what they’re doing in real life. Through a webcam link, it might even allow us to bring in live situations from video cameras elsewhere.
“We can link different rooms together, so we can teach in one room and have students in another. This means there is also the potential (bandwidth allowing) of teaching live to our sister course in Malaysia or even exporting our teaching elsewhere.
Acknowledgements.
“The system would not have been possible without the expert help and dedication of Colin Rowe, our School Facilities manager, Dr Matt Boyd, lecturer, Andrew Cripwell from AV2000 who installed the system, and the VLL lab who provided the funding. Many colleagues, in particular Dave Keating, Tony Shaw, Kevin Shakesheff and Linda Trigg also contributed significantly to its development. All the pharmacy students who kindly agreed to be photographed during the lab are also gratefully acknowledged.
This is an edited transcript from Colin’s presentation at the Visual Learning Lab Projects Day held in June 2008. Produced March 2009.
Prof Colin Melia
Associate Professor, Faculty of Science
School of Pharmacy
This article was originally published as part of PESL’s Teaching at Nottingham collection.
No comments yet, fill out a comment to be the first


Leave a Reply