
March 2, 2021, by Matt Davies
3D digitisation: the University of Nottingham Museum photogrammetry project
Photogrammetry is a method of creating a digital 3D version of an object (or space) by capturing multiple overlapping photographs of it from every angle then running the photos through software to produce a 3D version.
The artefact used in these illustrations is: Roman Face pot from Margidunum, Bingham, Nottinghamshire, University of Nottingham Museum collection.
The University of Nottingham Museum Keeper, Clare Pickersgill, had approached the DTH in 2020 about collaborating with us and the student volunteers on projects to enhance their digital presence. Following a meeting we decided on two projects, one to produce 3D models of some of the museum’s artefacts and the other to create some information and marketing videos. We were very pleased to invite Clare and her colleague, collections manager Mark Laurie along to speak about the Museum and the collaboration to the 2020 – 21 volunteer cohort in October. Then, regular DTH partner Joe Bell from the University’s Video Unit who would be running the video project, and I, the photogrammetry project, pitched the ideas to the volunteers who chose which they would like to work on.
The 3D project was always going to be challenging; photogrammetry is a relatively new and developing process and there are steep learning curves. The effects of the COVID-19 restrictions on access to the artefacts, equipment and software – and indeed each other (we are a team!) exacerbated these challenges further. But hey, we enjoy a challenge!
For our photogrammetry projects, DTH follows a process developed by Dimitrios Darzentas of the University’s Mixed Reality team and demonstrated by him in DTH in 2019. There are three stages:
- Photographing the artefacts.
- Running the photographs through 3D software; Meshroom.
- Clean up and visualisation of the 3D model in Blender.
Photographing the artefacts.
In general, photogrammetry will work with even the most basic of equipment, including mobile phone cameras, and with any model in any environment – even a statue outdoors – but it will give varying results. For this project we need the most detailed 3D models possible, so using a good DSLR camera in studio conditions was essential.
The photography stage involves using a lightbox, turntable and DSLR camera on a tripod. The object is placed upon the turntable which, along with the camera, is synchronised via an app called Foldio 360. As well as reducing artefact handling, this method allows the camera settings to be at optimum with the aperture being open as wide, and for as long, as necessary without the camera picking up any slight movement of the hands and blurring the image.
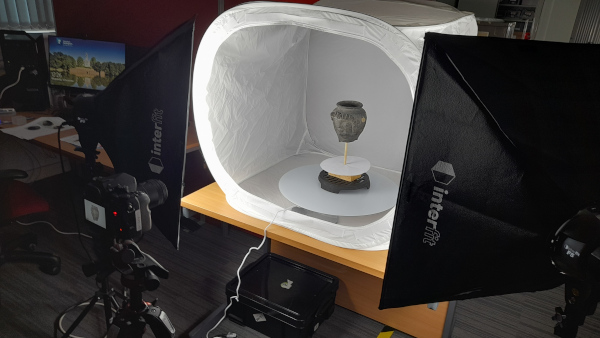
Fig.1, Capturing the artefact in the DTH.
Some objects are not suitable for photogrammetry as the 3D software does not work well with shiny or uncomplex surfaces (meaning the well-polished flint axe head was right out!) but a selection was made, Mark then brought the objects to DTH and gave me a socially distanced crash course in artefact handling, and the photoshoots were set up. There were many challenges over the coming weeks, photographing a variety of objects of different shapes, sizes and fragility. Many had to be supported on the turntable, and whilst I turned to the Heath Robinson manual on setting up lighting and cameras, Mark, on occasions, joined me in the DTH and referred to the same manual to create props and stands for the objects.
The safety of personnel as well as artefacts was paramount and during the sessions where we were both present in DTH, work had to be carried out whilst wearing spectacle steaming facemasks and keeping two metres apart at all times adding to the challenges. Eventually the third lockdown stopped the photoshoots altogether, but not before twelve objects were captured and ready to be put through the next stage.
The 3D modelling stage.
Due to the restrictions, the student team were not able to join me for the photoshoots -although they did on one occasion via video link which at least gave them an overview of the process. In the meantime, they had been learning to use the software for stages two and three, Meshroom and Blender. This process was further complicated by having to be conducted remotely as Meshroom at least requires a graphics card most of us would not have on our home devices. With the help of the University’s IT team, both Meshroom and Blender were uploaded to a suitable campus PC and the voluntteers given exclusive access remotely. This meant that they could carry out these complex and graphics- heavy processes by accessing the campus PC via their own devices without leaving their locked down homes / accomodation.
As long as the photos are of good quality and all angles have been captured, this stage is straightforward, at least in the first place. It is just a case of uploading the photographs to Meshroom, hitting ‘start’ then sitting back and waiting (sometimes for a few hours). The software runs through a complex process producing a point cloud using the position and orientation metadata from the camera, generating a geometric surface, and then applying the material gleaned from the photographs to the surface -almost like wallpaper! The progress of this process can be followed along the ‘nodes’ at the bottom of the user interface (see fig 2) which can be tweaked or moved around to adjust, or add more, processes to the workflow if, for instance, you wanted to combine two halves of an object.
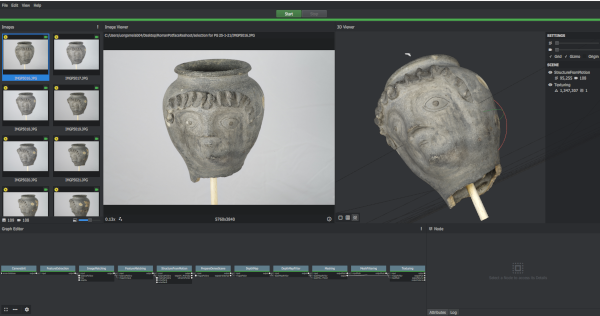
Fig.2, Roman face pot photos are loaded in the left panel, inspected in the middle, the 3D model appears on the right.
Clean up / post processing.
The resultant 3D digital model will invariably need some tidying up. There may be excess ‘topography’, ie’ blobby bits’ around the model where the software has been unable to match up parts of the object or parts of the equipment, including those Heath Robinson props have been included. These have to be removed, which we do in Blender, a free and open-source software usually used for creating 3D models, animation, virtual reality and computer games.
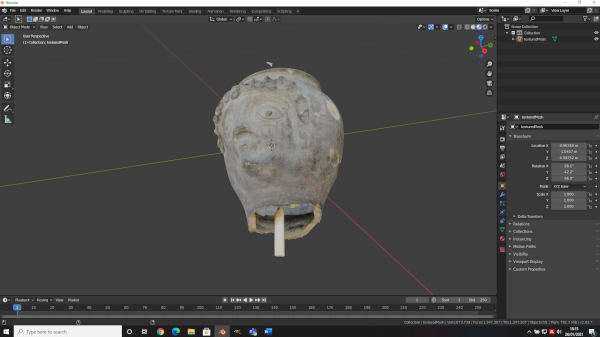
Fig.3, The face pot -with prop -in Blender
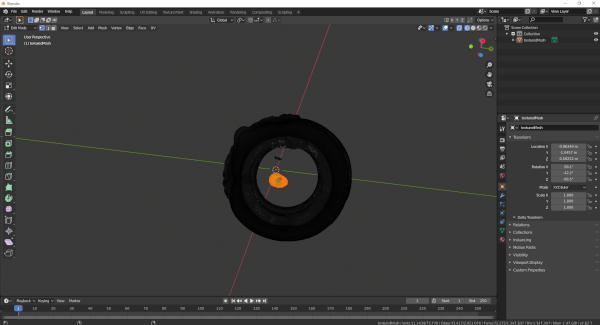
Fig.4, The face pot is turned on its side, with the prop highlighted (in orange) and ready to be deleted.
The 3D version of the Roman face pot can be viewed here, and has already been successfully used for the Classics and Archaeology’s February Offer Holder day. More models will be uploaded soon and, it is hoped, will also be used for teaching and research. Further information on the 3D photogrammetry process and other digital processes is available to UoN staff and students on the DTH’s SharePoint page here.
The student volunteer team working on this project are; Ellen Steel, Samuel Jenkins, Alev Ozturk and Naomi Atinuke and we meet weekly via Teams to discuss successes and challenges.
These 3D models may also feature in the DTH’s University Museum video project currently being run Joe Bell and his team of volunteers. More about that on this blog soon!
Visit the University of Nottingham Museum’s page here.
No comments yet, fill out a comment to be the first


Leave a Reply