October 10, 2022, by Helen Whitehead
Using images in teaching
We’ve been asked recently about good practice in using images in teaching. Which can you use, how do you prepare them and how do you use them?
Copyright
 Images must all be checked for copyright. Provide your own images (take pictures) or use images that have a Creative Commons licence (include the correct attribution somewhere). The University’s image bank can also be useful but beware of overuse of the same images. You can use sites which allow full unrestricted use and check if attribution is needed. We like Pexels [external website, opens in new window] and Pixabay [external website, opens in new window] for royalty-free images (no login necessary). For help with how to source copyright-safe images you can contact Learning Technology. No image should be included in Moodle that isn’t copyright-safe and the correct attribution for the image must be provided.
- you own the copyright,
- the university owns it,
- the copyright is stated to be free, e.g., Creative Commons – but note and act on the different restrictions in the various types of Creative Commons licence
- you have the permission of the copyright holder.
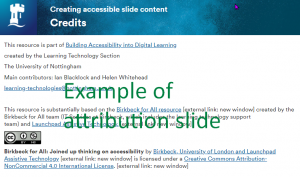
 Ways to add attribution include: to add an extra slide in the Powerpoint, or an extra Xerte page for attribution, or add a caption to the image in Moodle or put it in the ALT description or any other associated text. You can also add an attribution to any image that is uploaded to Moodle.
More information:
- A note on copyright [Workspace page: opens in new window]
Sizing
Use any images at an appropriate size. Resize images (e.g., in a Graphics package or simply MS Paint) before adding them to the Moodle page. The size can be tweaked slightly when you embed it in the Moodle editor. Note that if a large image is added to Moodle then Moodle can resize it, but it will download at the bigger size and might take a long time (especially on mobile data) and slow down page loading – so do resize large images such as photographs BEFORE you import them,
- How to get images ready for Moodle [Workspace page: opens in new window]
Design
Images should be located and designed in a consistent manner. All images should work in the accessible themes as well. Use icon sets rather than individual icons with different designs. If you’d like to see examples of icon sets contact Learning Technologies.
Accessibility and use
Follow accessibility guidelines for images. Make sure you add ALT text to all images. This should be meaningful and describe the purpose of the image, as an alternative way of accessing any relevant information in the picture. For example, if the image is of a table then it is better to redraw the table accessibly within Moodle’s editor. You can leave ALT text empty if the image genuinely is purely decorative (e.g., a divider line or icon to attract attention visually).
- Accessible text and images [Xerte Toolkit: opens in new window]
- Word – Accessible images, charts and graphs [Xerte Toolkit: opens in new window]
- How to add an image to a Moodle label, page or other text area [Workspace page: opens in new window]
No comments yet, fill out a comment to be the first

Leave a Reply